Surviving With Woodworking In The Real World

You're probably wondering...

At this point you are probably wondering about progress on the rustic office. Does it seem like it's taking forever? I can tell you that it is, I am literally drying the wood in my shop.

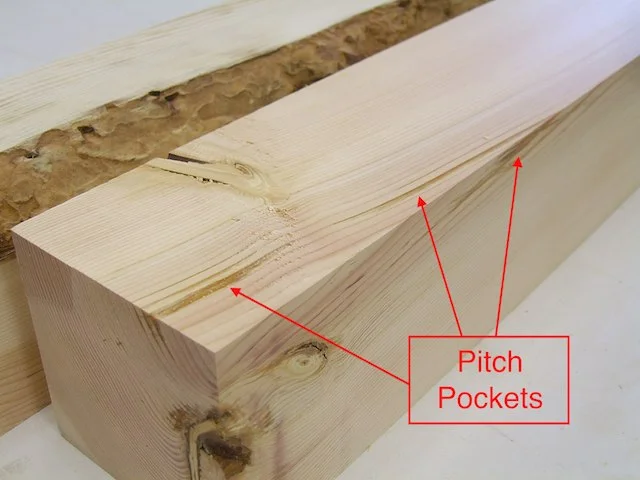
To catch everyone up to speed, I have a rustic office project in my shop. It has been quite a challenge. The clients had the idea of using 10"x10" doug fir beams as the material to build their home office. The beams were left over from the construction of their timber frame home and they are 10 years old. 

Romantic Notions

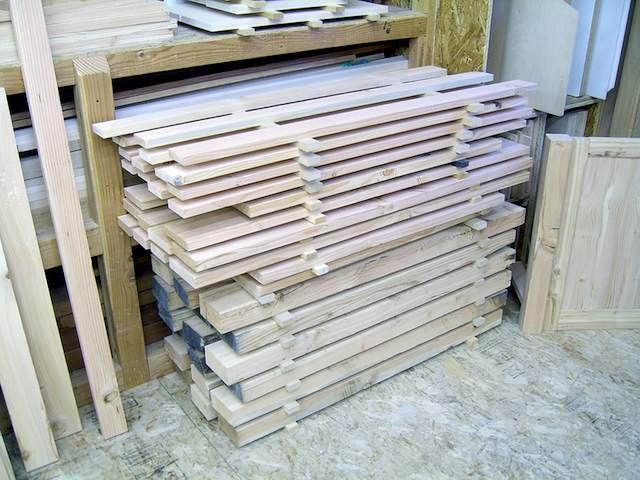
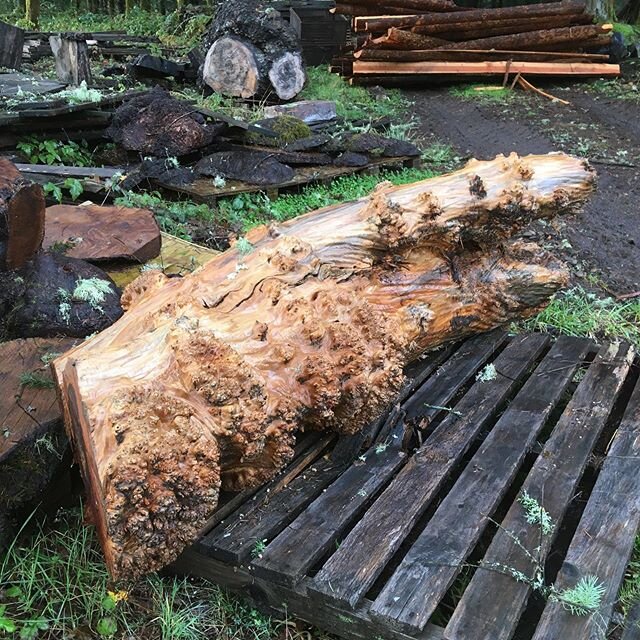
Beams for constructing office.Everybody has heard the stories of using old lumber or timbers that has air dried for years and it is a very romantic notion. Romantic - yes. Challenging - incredibly. There is a false notion that old timbers are dry, stable, and ready-to-use, and they just need to be milled for use.

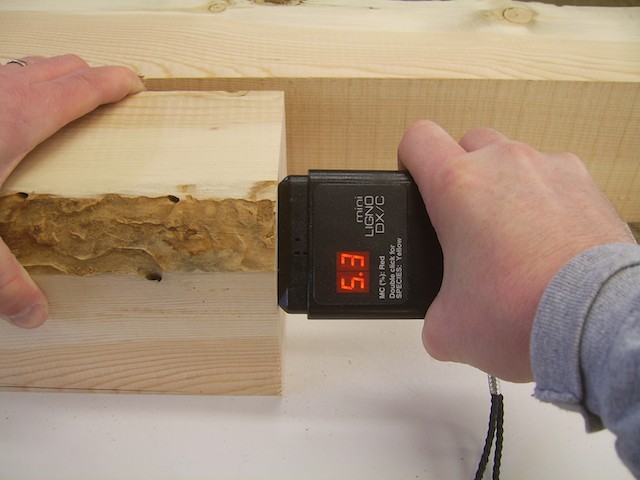
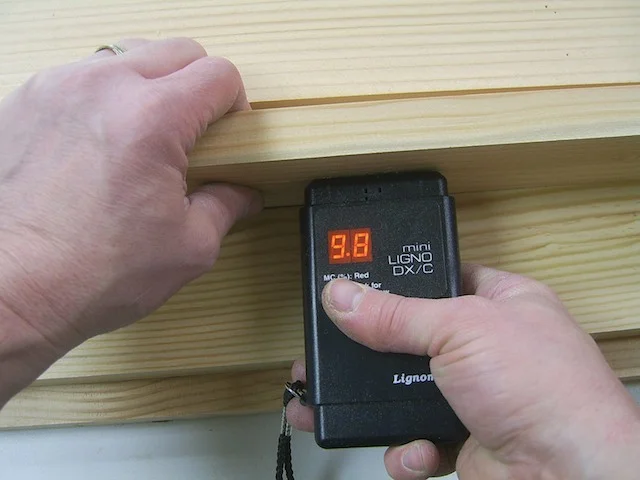
These timbers have sat outside unprotected for 10 years absorbing and releasing the environmental moisture. Being that they are 10"x10" instead of 1"- 3" thick, they hold quite a bit of moisture. I had the beams rough milled into quarter sections and I got moisture readings of 15%-18% on the interior with exterior readings at 8%-10%.

This unequal balance of moisture content can cause serious problems with cabinet construction. It is a factor in causing twisted and warped pieces. The way to deter these issues is to take the material down in stages. It has to be continually peeled open, re-sawn close to rough over size dimensions, re-sawn again, then milled to final thickness, and it has to be stickered in between each step to properly air dry and stabilize.

When a client says that they want rustic furniture or cabinets, it really means that they want it to look rustic but that they want doors and drawers to lay flat and operate smoothly. This can present quite a challenge and right now I am neck deep in that alligator.

How Do You Survive?

With the logistical challenges that this situation creates, it can wreck your construction schedule and your income. Progress payments are agreed upon in the contract and made according to benchmarks in the construction. If you can't progress then you don't get paid. That can really cripple your ability to make the house payment.

You have to become good at juggling the schedule. There is always more than one job lined up at a time, but as a small shop, discretion and sound judgement must be used to not get in over your head with too much work at once.

The way that I like to handle it is to have no more than one big job at once with small "filler" jobs that I can plug in here and there as the schedule opens up. It does depend on what opportunities come your way, but after 12 years in the business, I can say that there has always been a good mix of large and small jobs. This is just really the ideal situation to insure cash flow.

The amount of work you have on your plate all at once will vary depending on if you work alone or have any number of employees, but for the most part I am speaking to small shops and individuals. The big job will dominate your time. The small filler jobs may be a quick repair of some type to a full day or two, but the key is that they are flexible and can be held at the ready position until needed.

What I have noticed over the years is that the schedule is very fluid, there are always changes occurring. It is like a river that continually flows the same basic direction but it occasionally changes it's course, sometimes a little and sometimes a lot.

So today's lesson is that flexibility is key to staying busy and to financial survival.

That's all for now!

Remember - You can't live the dream if you don't spend time in the shop.

Your friend in the shop, Todd A. Clippinger

Share the Love~Share the Knowledge

 Don't Hold It All In~ Click Here To Leave A Comment!

A Lesson Review

Pop Quiz!

Didn't you just hate the pop quizes back in school? Well I have one for you today.

What did we learn about monitoring wood moisture content?

• Take readings often.

• Take readings from various locations.That includes the middle and ends of the stock (edge or face) and if you have an opportunity, from the inside when it is cut open.

• Observe the relationship of the changing moisture content and the behavior of the wood movement. Also compare these things to the specific grain patterns and the location of movement in a board. For example: where a twist may center itself.

These things are important to observe as you learn to understand a board and what it is telling you.

Yesterday I was working a piece of the doug fir beam. It is a beautiful piece that I am making a desk leg out of.

Beam.jpg

5"x5" Beam

After I cut the stock into sections, I took meter readings from various locations on the ends of the freshly cut wood.

Normally, if a board is sitting for a long time, I do not take readings from the end. But, if I just cut it open, I will meter the fresh cut end that came exposes the interior of the board.

Here is something that you should take note of. My stock is 4 3/4" square, if I meter the center of the stock, the moisture content will register higher than if I meter closure to the outside edge.

Moisture Reading 8.5.jpg
Moisture Meter 5.3.jpg

See the difference in the readings of the following pictures. Moisture Reading 8.5 Moisture Reading 5.3

This is not alarming and is normal. The wood obviously dries from the outside face in and from the ends in. What this also means is that when it is milled open, it should have a chance to equalize before putting it into a project to avoid issues of twisting.

The part of the wood that contains a higher moisture content is going to be swelled in comparison to the drier part of the board. It will be necessary to let it settle down.

Pitch - A Sticky Issue

This doug fir stock came from beams that sat outside for about 10 years. Most of the pitch has solidified and no longer runs.

This is a good thing because you should see the amount of pitch that some of this wood has. If this was fresh pitch, it would be running all over the place.

1 Pitch Pockets.jpg
2 Pitch Pockets.jpg

Pitch PocketsMore Pitch Pockets

Even now the pitch has been creating a mess of my tools. After milling out a tenon on the tablesaw...

Checking Tenon.jpg

Tenon cut on tablesaw.

just look at the pitch build up on the throat plate!

Pitch on Saw.jpg

Pitch on tablesaw.

The pitch has just enough body to it that it can be easily scraped off and the residue dissolved with solvent.

Pitch Scraped Off.jpg

Pitch scrapes off easily.

Fortunately for me, the design of the project is rustic and the clients are familiar with the nature of the wood.

This allows me some grace so any issues with finish will be minimal. I will need to seal the pitch with shellac to deter problems, but I am not sure that I can outright avoid them.

That is all for now. Be sure to check back regular and see what's new!

Your friend in the shop - Todd A. Clippinger

Share the Love ~ Share the Knowledge

The Challenges Of Building A Rustic Office

A Couple Of Challenges

The challenges of working with the material for this project are ever present.

One issue is the maintenance that this material causes and the biggest issue is the dimensional stability.

Maintenance

For the readers that are just joining us for this project, I am using doug fir beams left over from the construction of a timber frame home to construct an office desk and cabinetry for that same home. The beams are about 10 years old and have been laying outside, stickered on the ground, but unprotected.

Any day that involves milling this material to any extent results in cleaning tables, blades, and knives down with solvent. Most of the sap has crystallized over the years and does not bleed out but it leaves a mess none the less.

The table surfaces load up with a sticky wax residue that causes a lot of drag when pushing the material across the tool. This causes a bit of safety issue because a smooth sliding surface is safer than a sticky one when milling and cutting material.

Blades and knives of the tablesaw and planer will load up with the residue. This causes more friction and thus leads to an ever rapidly increasing build up of the pitch. It is a situation that quickly decreases the cutting efficiency of blades and knives. It has occurred  on a regular basis that I have had to clean cutting edges and surfaces twice a day. While I did figure some time in the bid to do this, it has exceeded my estimations - lesson learned.

Cleaning Table Saw.jpg

Cleaning tablesaw and applying TopCote.

I use solvent to strip the sticky residue from the tools and I like to apply a product called TopCote to the tools. This creates a slick tool surface that allows for smooth feed of materials. This product does not cause contamination that leads to adhesion issues or fish eye when applying the finish.

TopCote is sprayed on and then buffed off when dry, similar to waxing a car.

Topcoat.jpg

TopCote

Dimensional Stability

Dealing with dimensional stability has been a constant issue, but I will share with you what I have done to be as successful as possible.

Choose The Best Material Possible

I have been dealing with two sources of material, one is the original 10 year old beams and the other is new stock from the lumber yard. I took several moisture meter readings of both batches of material and have been following and observing them closely.

Stack of beams.jpg

Old beams on bottom, new beams on top.

To be specific, the old beams had a moisture content anywhere from 21% up to 28%, but with most of it in the 21% to 24% moisture content range

The new doug fir stock had moisture content readings from 21% to 25%. the most frequent readings were 21% to 22%

Solutions To Avoiding Dimensional Issues

The first action to reduce dimensional stability issues was to choose the best cuts of material. For the old 10"x10" beams, I had them milled into quarters. The pith of the tree was nearly in the center of every beam and this automatically created quartersawn rough stock. As I continued to refine the stock I have paid close attention to the grain orientation to preserve the integrity of the quartersawn cut.

For the new stock I also picked the best quartersawn material I could find. You might be surprised to know that it is very possible to get really good quartersawn material off the shelf at the lumber suppliers. It will involve some digging but it is do-able.

Quarter Sawn 4x4's.jpg

Quartersawn 4x4's

As I continue to mill it down, I plan the cuts to maintain the quartersawn orientation.

Quatersawn Stock.jpg

Maintain quartersawn orientation throughout milling process.

Take It Down In Stages

Considering that both materials have different histories and origins, the same principle applies to both. Never mill the material down to the finished dimension right away, take it down in stages, always leaving it oversized. Milling the material open and then letting it relax allows it to acclimate and continue drying in a controlled manner.

Ripping Stock.jpg
Planing Stock.jpg

Ripping down to the final rough stage.Planed but left a little oversized and time for one last rest.

Monitor Progress

If you are dealing with stock such as this, a moisture meter is a necessity.

You will need to know how to use it and how to accurately read the material. I have extra material cut in anticipation of the higher than normal loss rate. As the wood twists, I will use the bad pieces to cut open and measure on the inside.

If you take a moisture reading on the outside it may be extremely low, but keep in mind the meter will only read to a certain depth. If you have the opportunity to cut the wood open and read the inside at the center then you get a more accurate reading and understanding of what is going on inside the wood.

Meter Reading 5.3.jpg

Meter reading 5.3 on outside face of stock.

You should do this to gain experience of using the meter and an understanding of what the numbers really mean.

Be sure to measure different boards in different locations. Remember that the readings will be low on the outside of the board, and if you cut it open, the readings will be highest near the center and lower near the ends even on the inside of the board.

Taking the readings and observing the behavior is the best experience that you can have to understanding the nature of wood.

Meter Reading 8.9.jpg
Meter Reading 9.8.jpg

Meter reading 8.9 on freshly milled face of wood.Meter reading reveals 9.8 in the center of the board freshly milled open.

Don't be desparaged by differences, you are looking for an overall average. But also compare your readings to the individual characteristics of the board. This is valuable information that you will draw upon as you pick lumber in the future.

Mill & Rest

After cutting and planing this stock down to it's final dimension I need to let it rest one more time. This particular project has required more of this than normal. A low moisture content on one side and a high moisture content on the other will lead to a warped board. Letting it acclimate and dry a little more alleviates the problem.

Always sticker the wood to create space between the layers. Also be sure to leave some space on the sides to create as much air flow as possible. Never blow a fan on it to accelerate the drying and acclimation. You will cause the wood to wick out the ends at a much faster rate than the center can give up and this will cause checking on the ends and twisting. The wood does what the wood wants to do in it's own time.

Restacked and Stickered .jpg

Stacked and stickered for what should be the final rest.

Do Not Introduce Too Much Moisture

During the glue up for particularly difficult material, do not use a lot of water to wipe away the glue squeeze out. This will have an adverse affect on the panels. Rely on scraping and sanding off the squeeze out to avoid adding moisture.

Sometimes It Can't Be Stopped

Sometimes you can do all the right things and it still doesn't work out in the end. While this is lost time and labor on one hand, use it as a lesson to understand what went wrong and why.

Sometimes you learn through success and sometimes you learn through failure. Even as a pro, the learning never ends.

warped panels.jpg

Warped panels.

That's all for now. Be sure to check back often to see what's new.

Your friend in the shop - Todd A. Clippinger

Share the Love ~ Share the Knowledge