Laying Out The Curve In A Rustic Office Desk Top

A Basic Desk

Simple 90° Desk

This particular desk was pretty easy to design, there was no call for cabinets or drawers underneath. 

In designing this desk, the first thought is to fill the area with a simple 90° structure. This forces the user to sit at the right or left wing.

Desk With 45° Inside Corner

The next consideration would be to fill the inside corner with a triangle to create an angled seating area. This makes great use of the corner and creates a comfortable work station. The computer monitor is tucked into the corner and a person sits with books, papers, and folders arrayed on the right and left wings. This provides easy access to a large area to the right and left as office work tends to spread out. 

Desk With Inside Curve

The next step in the thought process of designing this desk was to fill the inside corner with a curve instead of a diagonal. Curves are a little easier on the eye, they tend to add a little more visual flow. The inside curve on this desk looks appealing and provides a good place to sit between the right and left wings.


The Layout

The desk material is 2" thick and I knew that I wanted to use a template in creating the curve in the desk. 

Scribing the arc.

I started with a piece of 1/2" plywood that was a little oversized of the arc I wanted to create. I mapped out the location of the desk that would be underneath the template. Now I knew where the structure was located.

I have a simple 4' flat metal straightedge that is quite flexible and would span the two points of the arc. But I needed a way to hold it steady while I marked both ends of the arc. I cut a couple of blocks that were 1 1/2" thick with a miter cut on one end.  


Blocks with miter cut allow access for pencil when scribing.

By using 1 1/2" thick material, that made the blocks tall enough to support the height of the straightedge. The angled cut allows me to get my pencil into the corner to mark as accurately as possible. Now keep in mind that accurate is relative here because I am working on a "rustic" style desk. 

After flexing the straightedge to create the desired arc, I scribe it. Then I like to flip the straightedge end-for-end and see how it reconciles with the first mark. There is almost always a little deviation and I scribe the new line. Before cutting I double check to see how the arc looks overall


Detail of scribed arc.

In my shop, as well as most shops, we are not running CNC equipment to layout or cut our arcs, so they are not going to be machine perfect. But you can increase the accuracy by doing a couple of things.

First, insure even pressure in the middle of the straightedge when when bending it to create the arc. Second, make sure the end points are securely and equally anchored, and the last step is to double check the layout by flipping your straightedge end-for-end and lay it out again.  

No matter what you use to create the arc, whether it be a metal straightedge, wood strip, or plywood strip there will be a slight deviation somewhere in the line. If you flip the straightedge and lay it out again, it will usually deviate at the same point in the straightedge. When you scribe the second line, the deviations will be revealed and you will be able to make adjustments accordingly for the actual cut.

Once you get the arc lined out, it is time to cut. But that is for the next installment...

That is all for now. Be sure to spend some time in the shop practicing what you learn.

Your friend in the shop - Todd A. Clippinger

Share the Love~Share the Knowledge

 

Choices, Choices - Do It Yourself Or Sub It Out?

To Do Or Not To Do? 

That is the question. Whether 'tis nobler in the mind of the craftsman to do all the work himself, or to suffer the slings and arrows of critics for subcontracting some of the labor burden to others.

This situation may be more specific to me as a business, but the principle can be applied to everyone. As I was bidding on my current project, a rustic office, I was faced with the decision of what to do about milling the beams? Is this something that I should do or pay someone else to do it for me? 

As a remodeling contractor I am faced with this decision on every project. How much of the work should I do myself and how much should I hire out? Plumbing and electrical issues are easy to decide, Montana State regulations and my liability insurance won't allow me to handle these. But most all other facets of the trade are open to being done at my discretion.

I determined that I needed to cut each of the beams into quarters for the full length. I have the equipment necessary to do the job and I could hire someone for the day to help me handle the material.

To make a good decision, I realized that I needed to become better acquainted with the material. To do this, I took some small beam sections and did a practice run milling them on my equipment.

Milling Beams On Bandsaw

I had never milled anything this rough and unwieldy on my bandsaw. I snapped a chalkline down the center line of the beam and cut it in half with great results. Next I shaved the sides open with an equally impressive result.

Pealing open the sides of the beam.

After cutting them open on the bandsaw I finished processing them on the planer and then squaring them up on the jointer.

Sending beams through the 15" planer.Squaring up on the jointer.

When I was completely finished I had milled open three beams at 44", 30", and 22" long and they looked great. It was exactly the stock that I was hoping for.

Resawn, planed, and squared.

Collecting The Data & Making A Decision

As I milled the beams there were various types of information that I was looking for. I tracked my time, observed the handling characteristics of the material, the capabilities of my equipment, and included the clean up as well.

I determined that I could well handle the smaller beam sections, but an 8' or 9' beam might be a bit difficult. I could control a short piece for straight cuts down the middle and shaving open the sides, but probably not so effectively on a long one.

Sending the pieces through the planer and jointer was a bit of skewed data. I determined that I would actually be cutting the beams into quarters, not just in half as I did with these sections. The quarters would be more easily handled than the half beam sections.

My equipment seemed capable of handling the weight of the material, but it sure was tough on the knives and blades. The pitch and the dirt trapped in the beams was really hard on all of the cutting edges. It took forever to clean up the mess on the equipment and in the shop. 

By tracking my time I was able to figure out how many man hours I would have wrapped up in the rough mill process. This time has to include everything from getting it in the shop, set up, milling, through the clean up.

There was a certain point that I realized my shop and equipment would best handle the material. I had determined that point was after the rough millwork was done by another shop.

The local shop that I used had an old Delta bandsaw that must have stood 8' tall. It had  a 3-phase power feeder that looked like it could pull a semi truck. All that I had to do was drop off the beams and pick up the rough milled stock. 

Saving my equipment from the abuse combined with the convenience factor made the decision a no-brainer. I subbed out the rough milling.

Rough milled beams from local mill shop.

The Lesson Here

Just because you can doesn't mean you should.

Everybody will have a different set of parameters by which they make personal decisions on what they can or can't do in the shop. I hope that with sharing my experience you may be able to make better decisions in your own shop.

That is all for now. Be sure to stop back often.

Your friend in the shop - Todd A. Clippinger

Share the Love ~ Share the Knowledge

A Lesson Review

Pop Quiz!

Didn't you just hate the pop quizes back in school? Well I have one for you today.

What did we learn about monitoring wood moisture content?

• Take readings often.

• Take readings from various locations.That includes the middle and ends of the stock (edge or face) and if you have an opportunity, from the inside when it is cut open.

• Observe the relationship of the changing moisture content and the behavior of the wood movement. Also compare these things to the specific grain patterns and the location of movement in a board. For example: where a twist may center itself.

These things are important to observe as you learn to understand a board and what it is telling you.

Yesterday I was working a piece of the doug fir beam. It is a beautiful piece that I am making a desk leg out of.

Beam.jpg

5"x5" Beam

After I cut the stock into sections, I took meter readings from various locations on the ends of the freshly cut wood.

Normally, if a board is sitting for a long time, I do not take readings from the end. But, if I just cut it open, I will meter the fresh cut end that came exposes the interior of the board.

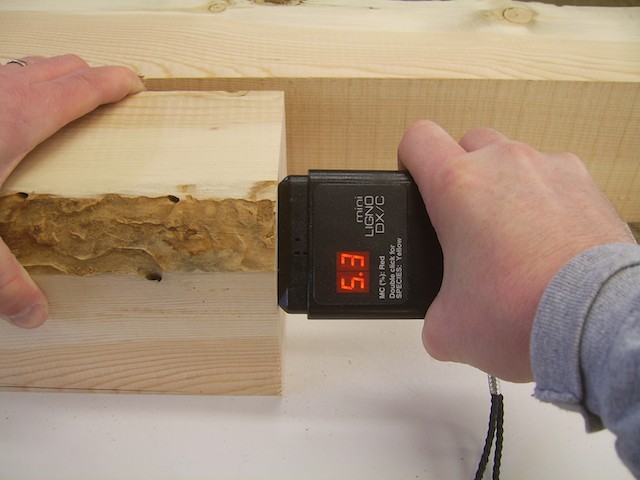
Here is something that you should take note of. My stock is 4 3/4" square, if I meter the center of the stock, the moisture content will register higher than if I meter closure to the outside edge.

Moisture Reading 8.5.jpg
Moisture Meter 5.3.jpg

See the difference in the readings of the following pictures. Moisture Reading 8.5 Moisture Reading 5.3

This is not alarming and is normal. The wood obviously dries from the outside face in and from the ends in. What this also means is that when it is milled open, it should have a chance to equalize before putting it into a project to avoid issues of twisting.

The part of the wood that contains a higher moisture content is going to be swelled in comparison to the drier part of the board. It will be necessary to let it settle down.

Pitch - A Sticky Issue

This doug fir stock came from beams that sat outside for about 10 years. Most of the pitch has solidified and no longer runs.

This is a good thing because you should see the amount of pitch that some of this wood has. If this was fresh pitch, it would be running all over the place.

1 Pitch Pockets.jpg
2 Pitch Pockets.jpg

Pitch PocketsMore Pitch Pockets

Even now the pitch has been creating a mess of my tools. After milling out a tenon on the tablesaw...

Checking Tenon.jpg

Tenon cut on tablesaw.

just look at the pitch build up on the throat plate!

Pitch on Saw.jpg

Pitch on tablesaw.

The pitch has just enough body to it that it can be easily scraped off and the residue dissolved with solvent.

Pitch Scraped Off.jpg

Pitch scrapes off easily.

Fortunately for me, the design of the project is rustic and the clients are familiar with the nature of the wood.

This allows me some grace so any issues with finish will be minimal. I will need to seal the pitch with shellac to deter problems, but I am not sure that I can outright avoid them.

That is all for now. Be sure to check back regular and see what's new!

Your friend in the shop - Todd A. Clippinger

Share the Love ~ Share the Knowledge