
Using A Template to Route An Arch
/The Photo File Fiasco
I like to add a lot of photos to my entries because so much information can be communicated visually. But it certainly makes things difficult if I move a file and it strips all of the images out of 2 weeks worth of entries.
However, I did learn a lesson about how storage files work for the site.
Creating An Arch
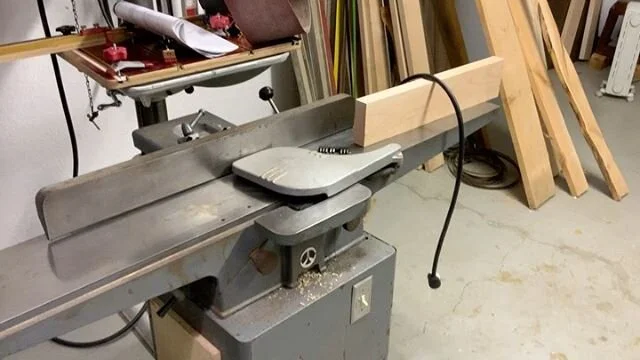
 Cutting template with jigsaw.If you remember, on my last entry I shared a method for creating an arch. I am creating the arch in a template first, then I will transfer it to the actual project. After marking the arch it is now time to cut it out in the template material.
I am using 1/2" baltic birch for the template. I use baltic birch because of it's wonderful handling characteristics and because the bearing or bushing guides all require more than 1/4" material. In my opinion it is well worth the money and it is part of the job cost. Transferring the arch to the desk.
As you can see in the photo, I have the template laying on the project because I used it to help lay out the pattern. If you do this, use caution not to cut into your actual project as you cut the template.
By combining the consistent nature of 1/2" baltic birch with a good jigsaw and blade, I can cut right on the line for my templates. This is where the cost of good quality materials and tools pays off for me.
After the cutting is done, I might have to do a little bit of sanding to smooth the arch. But with this project that was not necessary, the cut was really good and this is a rustic desk anyway. So now I transfer the arch to the project using the template.
 Cutting the arch in the desk.
Next, I cut the waste off the project. I prefer to leave some margin between the cut and the actual line. How much of a buffer you leave will be determined by personal skill level, equipment and cutting conditions of the material itself. But keep in mind that the routing step is next.
The less material you have to remove with the router, the lower the chances of suffering from tear-out. You may also need to use a climb cutting technique to help control the tear-out.
 Template routing the first half of the desk edge.The router bit is not long enough to cut the full face of the desk at once, so I start the routing on the bottom side of the desk. I take advantage of this and attach the template to the bottom of the desk with screws. With the rustic style of this desk, I probably could have attached it to the top and nobody would have thought anything of the screw holes.
 One half of desk edge routed.
Once the first half is routed I remove the template and flip the desk to continue routing from the other side.
When routing with the template I used a top bearing router bit. That is the bit had a bearing guide on the top end and it rides against the template on the top surface.
Now that half of the face is routed on the edge of the desk, I will use a bottom guide bearing bit. The bottom guide bearing will ride on the half that has just been routed. That means the first routed pass acts at the guide for the second pass from the other side.
 Routing the other half.Now that the full face is routed, I have to add some hand-hewn texture. But that is for another episode;)
That is all for now. Full edge routed in two passes.
Your friend in the shop - Todd A. Clippinger
Share the Love~Share the Knowledge